RV Solar Part III – The Installation

So, we come at last to the final installment of our story, and appropriately so on the last day of the year. It’s the last hurrah, the chocolate treat, the final ray of sunshine on the panels…you get the drift. Having decided on our equipment and specs we needed to make the very critical choice of whether to do it ourselves or get help. We’re relatively handy, but not exactly overly-confident and the idea of drilling a hole in our RV roof was enough to send me into a mild panic. So, for our personal sanity we decided help was needed and as it so happens AM Solar knew a good installer (himself a full-timer) who was travelling through Florida while we were here.
And that’s how we met Marvin.
Now, I’m not one to beat about the bush so I’ll just come right out and say it -> Marvin was marvelous. Not only is he a very nice and down-to-earth guy, but he knows solar and the final workmanship was beautiful. So, I’m very happy he came along and am equally happy to recommend him to others (his contact info is HERE and he’s travelling West from FL through TX and onto Yuma, where he’ll land sometime in March 2011).
Marvin spent around a day and a half doing the installation itself and a few extra hours chatting and going over questions with us. Since we didn’t do the install ourselves, I won’t go into all the nitty gritty, but I’ll point out some key points that made the installation work:
- Careful Placement of the Panels:

Marvin and Paul placing the solar panels on the roof The panels were placed on the roof so as to ensure there were *no* shadows from any of the existing structures up there (e.g. aircon, antennas). Also, they were placed so that they can be tilted with *no* shadows. Both these things are critical to make sure you get all the power you can out of those babies. Remember even a teeny amount of shadow can kill your power by huge amounts.
- Short, Efficient Wiring:

General Overview of our Installation. We were able to get a nicely short wire runs. Marvin did a lovely job of running lines from panels to the combiner box at the back of our roof. From that point it was a direct shot through the roof, down along our our back closet and into the floor to our back left storage bin where he installed the solar controller. The short & direct wiring job was the very reason we were able to stay within our voltage drop goals. Remember that the longer the wire, the more your loss and minimizing loss is what it’s all about
- Controller Located Close to the Batteries:

Marvin installs the solar controller in the bin right next to our battery bank. Our solar controller is in the bin directly adjacent to our batteries which is as close as you can get without being in the same room. This very close placement was what allowed us to meet less than 1% voltage drop between the charger and the batteries….another critical loss point. Marvin routed all the wires through the bin wall and sealed the hole to make sure the battery compartment was kept isolated.
- Attention to Details: Marvin did a very nice job of routing wires carefully, sheathing everything, sealing holes, tying up loose ends and so forth. The final job was very clean and workmanship nicely done.

To finish off our install project, the day after Marvin was gone and for a few days after we diligently measured voltage loss across the system. So far, so good. Everything indicates that we’re meeting our goals of 2% voltage drop from our panels to our controller and 1% drop from controller to batteries.
Did we do everything perfectly? Probably not. Does our system rock? We certainly think so! We’ve been in partially shaded sites (for part of the day) so we haven’t pushed the system to it’s max yet or run the full amperage through the wires so there’s always room for more measurement and improvements. That’ll be a project for 2011 and we’ll let you know how it goes.
In the meantime I wish everyone a Happy New Year and a fulfilling and joyfull start to 2011. See ya’ all next year!


congratulations…you will love this new freedom….have a happy and healthy new year…hope we run into you in 2011 jil
Thanks jil. Hope we cross trails this year too! Nina
Thanks for the detailed posts of your solar setup. You really do your homework so I’ll keep your blog in the back of my mind if we decide to make the solar leap.
Well … you do your homework most of the time. I still chuckle about one of your first blog entries. The one where you went to an RV show and walked out with a new RV after only a test drive (not that there’s anything wrong with that). You wrote “after going to the RV show on a whim, Like a happy drunken date, one thing lead to another and an hour and a half later we were the proud new owners of a brand new RV” . That was some powerful funny writing that got me hooked on your blog.
Half of my life is also impulsive, the other half is carefully researched. Keeps it interesting. And impulsive is fun.
Jim
Jim…can’t help but laugh…you sum me up so well 🙂 I have moments of deeply thought-out plans, and moments of wild abandon. I have to agree it makes life interesting 🙂
I have just stumbled on to your site. I too have an AM Solar installed system done right on their premises in Oregon. I am curious as to your controller is set at to bulk charge the Lifeline AGM’s. Mine is set for 14.3
This is certainly not in accord with Solar Bob’s views. He seems to be all for setting the charge very high. The Lifeline site says 14.2c to 14.4 is correct.
Do you have any thoughts on this. Thank -you for any input you can give me. I hope to test out my install this summer.
Hi Brian
Ours is also set at 14.3V for Absorb. That’s the correct level for Lifeline AGM, per the AGM battery specs. The higher levels that Handybob talks about on his site are relevant to wet-cell batteries. For those kinds of batteries (e.g. Trojan wet cell) 14.8V is the right level -> that’s the level that matches the battery manufacturer specs. His site really just emphasizes that it’s important to follow the battery mfr specs (which many of the charger mfrs do not do). So, if we had our old wet-cell batteries we’d be setting our charger at 14.8V, but for AGM, 14.3V is correct.
Nina
Hi, am in the process of installing my panels on my ’08 Diplomat. Is it possible to get some pictures of the combiner box and exactly where in the rear closet the holes were drilled in the ceiling and floor. thanks, Richard
YES, I can get you some pics. I’ll take ’em and get back to you soon!
Nina
Richard,
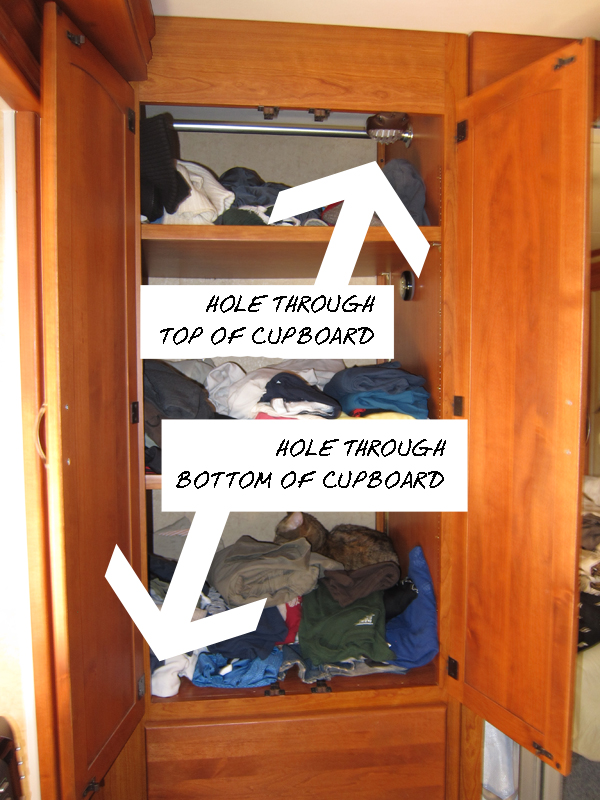
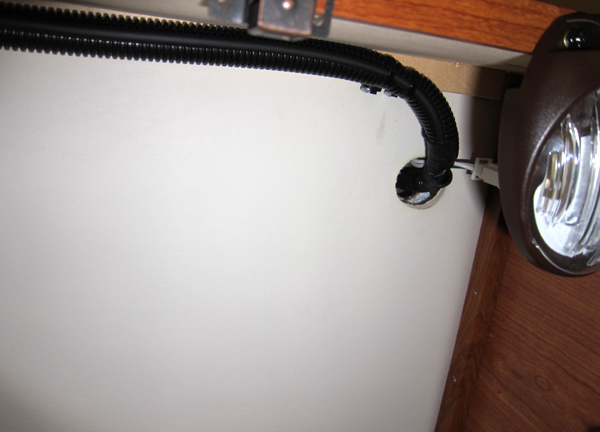
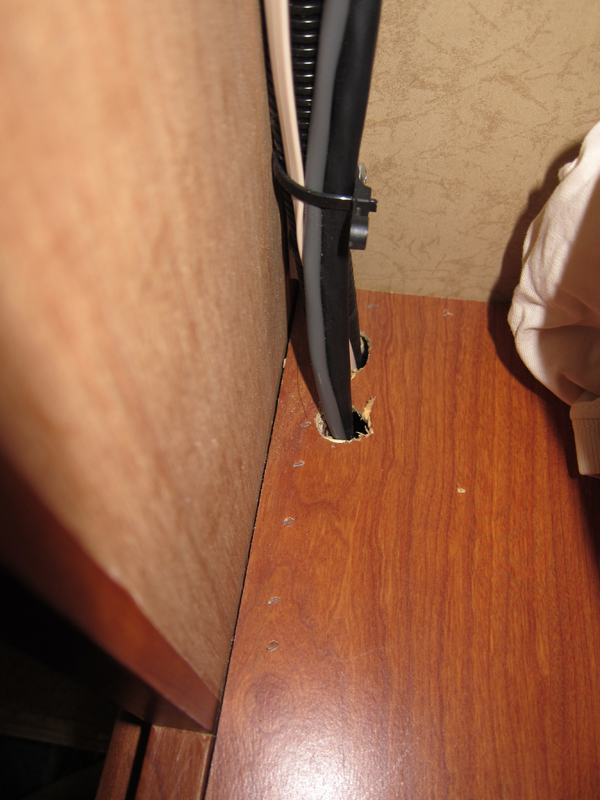
Have a look at these shots. The cupboard in the picture is the one in the far left back corner of our bedroom. The hole in the top of the cupboard was drilled at the very top front (outward-facing) right-hand corner of the cupboard (it’s almost exactly where you see that light). The hole in the bottom is at the very bottom front left-hand corner of the cupboard.
[caption id="attachment_8049" align="alignnone" width="208" caption="Picture of cupboard in our bedroom (back left corner of RV)"] [/caption]
[caption id="attachment_8049" align="alignnone" width="300" caption="Top hole in cupboard (by the light)"] [/caption]
[caption id="attachment_8049" align="alignnone" width="208" caption="Bottom hole in cupboard"] [/caption]
I still have to get up on the roof for a pic of the combiner box, so give me a little more time on that one. Hope it helps!
Nina
Thanks ever so much that is a great help
R
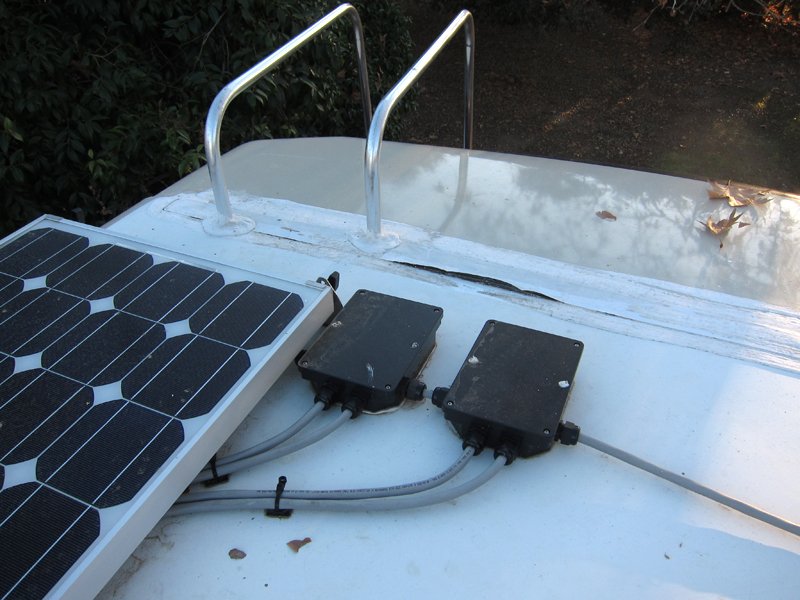
OK. Finally made it up on the roof. Here’s a pic of our combiner boxes looking towards our ladder in the back left of the RV:
[caption id="attachment_8049" align="alignnone" width="300" caption="Picture of combiner boxes on roof"] [/caption]
Nina
Hi Nina
I’m enjoying your blog. When Marvin installed the panel mounts did he screw them to the roof or just use an adhesive approach? I’ve read that if the roof surface is aluminum or fiberglass that it can be possible to simply adhere the mount to the room and avoid penetrations. Your pics look like you might have a membrane on your roof. Do you have any pics of the installed mounts? Also have you found climbing way up there & positioning the tilts difficult? (I find it’s the getting back down that is the most scary. I once had a nightmare about being stuck on a roof because I couldn’t get myself onto the ladder. My pulse increases just remembering the nightmare!)
— Regards, Ross (Prince Edward Island, Canada)
Yup, he just used the 3M adhesive. So, no holes for the panels which we really like! The adhesive is perfect for fiberglass and stays rock solid. I don’t have a detail pic of the mount on-hand, but if I manage to get on the roof in the next few days I’ll take one and post it back on here. As for tilting I’m OK to do the tilting, but I do have a bit of a scare of heights so getting down off the roof scares me too! Paul ends up doing most of the tilting for that reason alone 🙂
Nina
Hi,
Went to AM Solar which is 4 miles from where we live a few weeks ago to ask them about solar and what they could do on our 2010 Rexhall Aerbus. They were very friendly and said they had a guy there named “Marvin” that would look at my rig and get me set up. Yeah it is the same Marvin that did your install I will be bringing my coach in the week of 7-7-14 to install 7 100 watt panels & a Magnum MS2012 Inverter. I had already installed 4 6volt Lifeline batterys giving us 600 amp hours. We can hardly wait for the install to be done.
Bill
Outstanding! Another friend of ours just had Marvin do their install at AM Solar a few weeks back. I have every confidence you’ll be happy with the work. He’s a great guy & they’re a good outfit.
Nina
HI, Loving your website, and have gleaned many ideas and much inspiration for my project: building out a step van (AKA bread truck) into an RV! Also using a 24V system with 4 big panels and 4 Lifeline AGM batteries. Glad to hear they work well!
Simple sounding question that I can’t find a reliable answer to: For the “house” side 24v system, (everything after the fuse box, let’s say) do you wire the Neg side of every circuit back the the batteries, or do you “ground” the batteries to the chassis and then attach the neg side of appliances to the chassis wherever convenient (thus using the skin or chassis as the negative side, like a normal 12v car system)?
Thanks!